Our pear jelly recipe was born out of necessity—and a little bit of kitchen curiosity. A few autumns ago, I found myself staring at a sack of ripe Bartletts by the back door. They were too soft for slicing, too sweet for eating plain, and far too precious to toss. I remembered a jar of pear jelly a neighbor once gave me when I was living in Vermont. It was golden, fragrant, and so smooth it slid off the spoon like honey. That memory nudged me to give it a try myself. What came out of that day is now a seasonal staple in my kitchen—and the heart of this pear jelly recipe.
In this guide, I’ll walk you through every step of making this delicious, softly sweet spread. We’ll talk about the difference between jelly and jam, whether or not you need to use pectin, and what kinds of pears work best. I’ll share my own kitchen notes and a few unexpected ways you can use pear jelly that go way beyond toast. Whether you’re new to canning or looking for a nostalgic recipe to add to your pantry, this one is both simple and rewarding.
Check out our apple butter recipe for another seasonal favorite that fills your kitchen with warmth and spice.
Understanding the Pear Jelly Recipe Basics
What is pear jelly and how does it differ from jam?
From my own kitchen experiments and a few sticky surprises along the way, I’ve learned that pear jelly is all about the juice. Unlike jam, which includes mashed fruit pulp and pieces, jelly is smooth, clear, and made purely from the juice of the fruit. It’s the elegant cousin of jam—more refined, with a soft-glass shimmer and a delicate texture.
When I first made a pear jelly recipe at home, I remember thinking it looked like liquid gold in the pot. That clarity is what makes this jelly so special. You simmer the pears to extract juice, then cook that juice with sugar and pectin (if using) to get a perfect set. Jam, by contrast, can be chunkier and more rustic—great for toast, but not always ideal for glazing or gifting.
What makes pear jelly unique in flavor and use?
Pears have this lovely floral sweetness that’s gentle and comforting. They don’t shout like strawberries or tart up like cranberries. Instead, they give your jelly a mild, buttery taste that melts into anything it touches.
What I love most about this pear jelly recipe is how versatile it is. Sure, you can smear it on toast or biscuits, but you can also melt it down and brush it over roasted carrots, use it in baked Brie, or swirl it into plain yogurt for a quiet breakfast indulgence. It’s not just a spread—it’s a little homemade luxury that elevates everyday meals.
If you’ve never made a pear jelly recipe before, this is the perfect one to start with—simple, rewarding, and a true celebration of fall fruit.
Print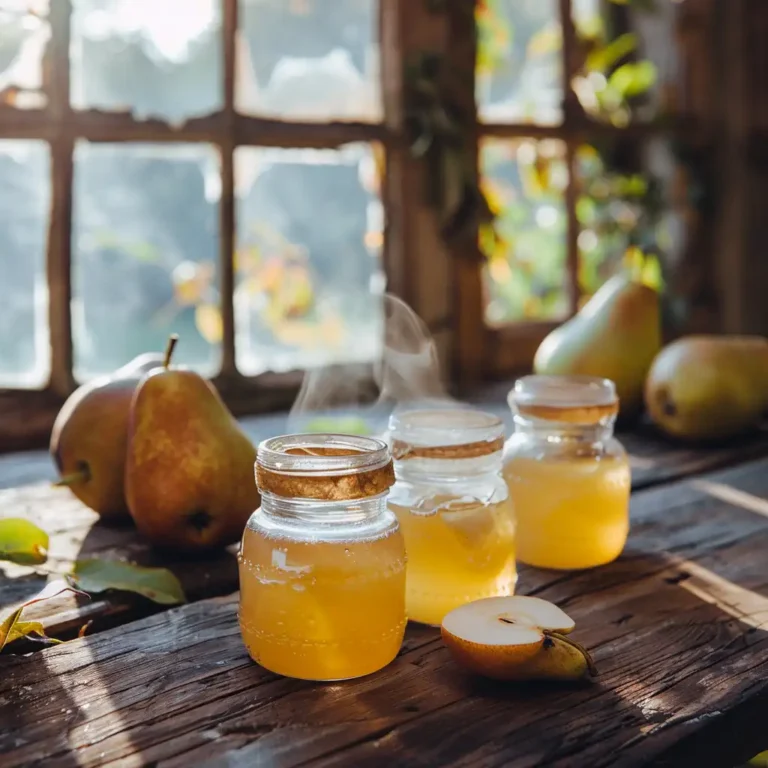
Japanese Pink Salt Recipe
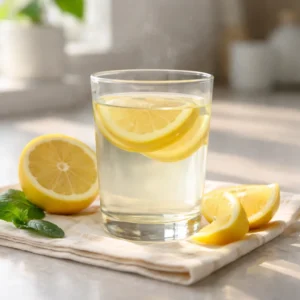
A mineral-rich Japanese-inspired drink using pink Himalayan salt, lemon, and warm water — perfect for hydration, balance, and morning rituals.
- Total Time: 2 minutes
- Yield: 1 serving 1x
Ingredients
- 1/8 teaspoon pink Himalayan salt (fine grain)
- Juice of 1/2 fresh lemon
- 1/2 teaspoon raw honey (optional)
- 8–12 oz filtered water
Instructions
- Warm the water slightly if desired — it should be body temperature, not hot.
- Squeeze the juice of ½ lemon directly into the glass.
- Add ⅛ teaspoon of pink Himalayan salt and stir until completely dissolved.
- Optional: Stir in ½ teaspoon of raw honey for a touch of sweetness.
- Sip slowly, preferably first thing in the morning, before food or coffee.
Notes
Use authentic pink Himalayan salt and fresh lemon for best results. Customize with cucumber, basil, or ginger if desired. Avoid if on a low-sodium diet or sensitive to citrus.
- Prep Time: 2 minutes
- Cook Time: 0 minutes
- Category: Beverage
- Method: No-Cook
- Cuisine: Japanese-Inspired
Nutrition
- Serving Size: 1 glass
- Calories: 10
- Sugar: 2g
- Sodium: 300mg
- Fat: 0g
- Saturated Fat: 0g
- Unsaturated Fat: 0g
- Trans Fat: 0g
- Carbohydrates: 2g
- Fiber: 0g
- Protein: 0g
- Cholesterol: 0mg
Pears and Pectin – What You Need to Know
Is pear high in natural pectin?
Here’s something I didn’t know until I messed up my first pear jelly recipe—it never set. After digging a little deeper (and a late-night spiral of jelly troubleshooting blogs), I realized the culprit: pears are relatively low in natural pectin, especially when they’re overly ripe. Pectin is that magical fiber that helps jelly firm up as it cools.
If you’re using very ripe pears, the natural pectin levels may not be enough to give your jelly that clean, firm texture. On the flip side, slightly underripe pears contain more pectin and can make a noticeable difference, especially when you’re working with a no-pectin pear jelly recipe.
Do you need pectin for pear jam or jelly?
Now, this is one of the most common questions I get from readers—and the answer depends on your patience. Technically, you can make pear jelly without added pectin. But it means a longer boiling process to thicken the jelly naturally, and you may not always get a consistent result.
When I’m in a rush or giving jars away as gifts, I often use liquid pectin. It takes the guesswork out and gives that sure-fire set I can count on. On slower days, I skip the pectin and cook the juice longer with lemon juice (which adds acidity and helps activate natural pectin). The result is softer, more spoonable, but equally delicious.
If you’re new to jelly-making, especially with a pear jelly recipe, using pectin can be a confidence booster. It lets you focus more on flavor and less on whether your jelly will pour like soup or slice like a dream.
Ingredients for the Perfect Pear Jelly Recipe
Pear selection: Which varieties work best?
Over the years, I’ve experimented with just about every pear I could get my hands on—Bartlett, Bosc, Anjou, even some wild pears a friend once brought from her backyard. The two I keep coming back to? Bartlett and Bosc. Bartlett pears are juicy, sweet, and incredibly aromatic. Bosc pears, on the other hand, are a bit firmer and earthier, which balances the sugar perfectly.
For the best results in your pear jelly recipe, I recommend using a mix of ripe and slightly underripe pears. The underripe ones provide a bit more natural pectin, which helps your jelly firm up without having to rely entirely on store-bought pectin. That balance between flavor and firmness makes all the difference in a good pear jelly recipe.
Oh—and don’t stress about peeling them. I keep the skins on while simmering. They add a soft golden tint and extra depth to the juice.

Additional ingredients you’ll need
Besides pears, your jelly needs only a few pantry staples:
- Granulated sugar: This isn’t just for sweetness—it helps preserve the jelly and contributes to its texture.
- Lemon juice: Adds brightness and acid, which helps with gelling and keeps the flavor fresh.
- Liquid pectin (optional): Use it if you want a firmer, more predictable set.
Here’s a quick breakdown:
| Ingredient | Purpose |
|---|---|
| Pears | Provides juice and natural sweetness |
| Sugar | Preserves jelly and enhances texture |
| Lemon juice | Adds acidity and boosts pectin performance |
| Liquid pectin (optional) | Ensures consistent and firmer texture |
This combination keeps the pear jelly recipe simple and forgiving. If you’ve got ripe pears and a little patience, you’re already halfway there.
Step-by-Step Instructions
How to extract pear juice
The first time I made a pear jelly recipe, I underestimated how important it is to extract clear juice. Trust me—don’t rush this step. Cloudy juice makes cloudy jelly.
Here’s what I do: wash the pears thoroughly, then quarter and core them. I leave the skins on—they help with color and natural pectin. Place them in a large pot and add just enough water to barely cover the fruit. Simmer gently until the pears are soft—about 25 to 30 minutes.
Next, strain the mixture through a dampened cheesecloth-lined colander or jelly bag. Let it drip overnight if possible—don’t squeeze it! Squeezing forces pulp into the juice and muddies the clarity. The next morning, you’ll have a beautifully clear pear juice ready for your pear jelly recipe.
Cooking your jelly to perfection
Once your juice is ready, it’s showtime. For every 4 cups of juice, I use 4 cups of sugar and 2 tablespoons of lemon juice. If using liquid pectin, follow the timing on the package exactly—it’s usually added after the juice and sugar boil.
Bring the juice and sugar to a boil in a heavy-bottomed pot. Stir constantly to dissolve the sugar. If you’re adding pectin, this is where it goes in—after that rolling boil. Boil for 1–2 minutes more. Skim off any foam that forms on top with a spoon.
Now for the set test: place a small spoonful of jelly on a cold plate and let it sit for 30 seconds. Push it with your finger. If it wrinkles slightly, it’s ready. If not, boil a little longer.
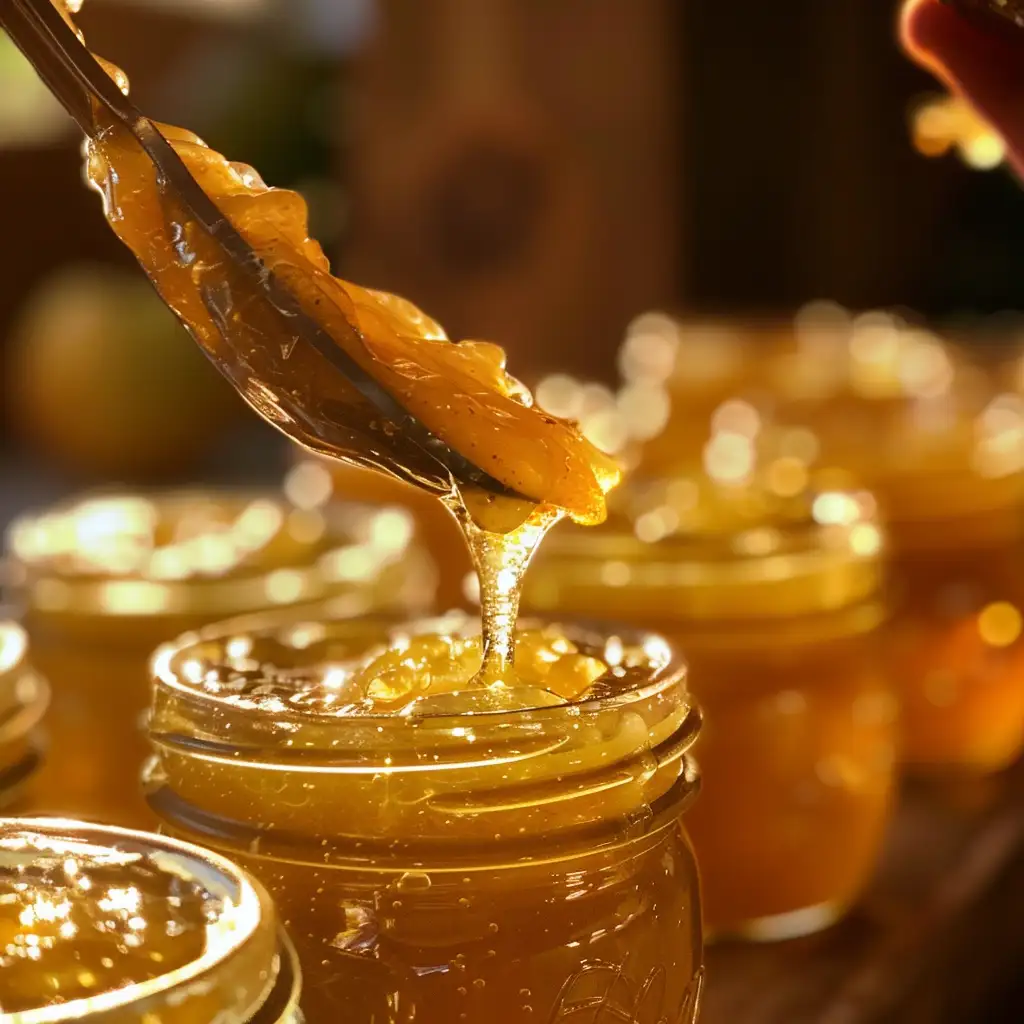
Pour your hot jelly into sterilized jars, leaving about ¼ inch headspace. Wipe the rims clean, seal with lids and bands, and process in a boiling water bath for 10 minutes to seal. Once cool, check seals, label, and admire your glowing jars of gold—each one a beautiful result of your homemade pear jelly recipe.

Do You Need to Peel Pears for Jelly?
Skins on or off: What works best?
When I made my first pear jelly recipe, I stood in the kitchen wondering whether to peel the pears. My hands were already sticky from slicing, and I thought, “Does this step really matter?”
Turns out, it doesn’t—at least not in the way you might think.
Since the jelly is made from juice alone, you’ll be straining out the solids. That means the skins, seeds, and even the cores won’t end up in the final product. I actually prefer leaving the skins on. Not only do they deepen the golden color of the jelly, but they also contribute a bit more pectin, especially if your pears are slightly underripe.
Plus, skipping the peeling saves a ton of prep time and keeps your pear jelly recipe process feeling like a joy instead of a chore.
When you might want to peel them
That said, there are a couple of exceptions. If you’re using very mature pears with tough or bitter skins—some late-season varieties can have this problem—you might choose to peel them to avoid off-flavors seeping into your juice. It’s rare, but worth keeping in mind if you’re working with overripe or store-bought fruit that’s been sitting around too long.
Still, for most pear varieties like Bartlett, Bosc, or Anjou, peeling isn’t necessary. Let the fruit do the work, skins and all, and enjoy the simplicity of a homemade pear jelly recipe that doesn’t overcomplicate things.
Best Ways to Use Pear Jelly
Beyond toast: creative pairings
If you think pear jelly belongs only on toast, I’m thrilled to change your mind. One weekend brunch, I paired it with goat cheese on toasted sourdough—and it was a game changer. The sweet jelly and tangy cheese balanced each other perfectly.
A good pear jelly recipe can go far beyond breakfast. You can use it as a glaze over roasted chicken or pork—just brush it on during the last 10 minutes of cooking and watch it caramelize into a glossy finish. It’s equally lovely melted into oatmeal or swirled into yogurt. And don’t forget baked goods! Add a dollop to thumbprint cookies or layer it into cakes for a surprise burst of flavor.
Looking for inspiration? Try DIY Cherry Syrup at Home—it’s another fun fruit-based project with similar uses.
Gift ideas and preservation
A homemade pear jelly recipe makes a thoughtful, affordable gift. I keep small 4-ounce jars on hand, tie them with twine and a handwritten label, and give them out during holidays or housewarmings. It’s a little jar of comfort and care—and way better than a store-bought candle.
Preserve your jelly for up to a year using proper canning methods (hot water bath). Always label with the date and batch flavor. I’ve found that storing jars in a cool, dark pantry keeps the flavor fresh for months.
Check out our Peach Preserves Recipe if you’re looking to fill more jars with fruity goodness and complement your favorite pear jelly recipe.
Troubleshooting Common Jelly Mistakes
Why your pear jelly didn’t set
I’ve had a few batches of pear jelly that ended up more like syrup than spread—and if that’s happened to you, you’re not alone. The most common reason jelly doesn’t set is not having enough pectin. Remember, pears are naturally low in pectin, especially when fully ripe. If you skip commercial pectin or undercook the mixture, your pear jelly recipe might stay liquidy.
Another issue could be not boiling the jelly long enough. The mixture needs to reach the gel point—about 220°F (104°C) at sea level. If you don’t have a thermometer, the wrinkle test on a cold plate is your best friend.
Luckily, soft-set jelly is still perfectly usable. I’ve used mine as pancake syrup or stirred into sparkling water for a homemade pear soda. But if you want to fix it, simply re-boil with more pectin or lemon juice.
Cloudy jelly and how to avoid it
You’re aiming for that crystal-clear glow, right? Then patience is key. One of the biggest mistakes is squeezing the juice bag while straining. I know it’s tempting—you want every last drop! But squeezing forces fine pulp through the cloth, which clouds the jelly.
Let the juice drip overnight, untouched. I usually set it up before bed and return in the morning to a bowl of clear, golden juice. Also, avoid stirring your jelly once it begins to set and be sure to skim the foam during cooking. These small steps make a big difference in clarity.
If you’re looking to perfect your pear jelly recipe without relying on boxed thickeners, don’t miss our No-Pectin Canning Guide. It’s packed with tips to help you master natural methods for that perfect set.
Frequently Asked Questions
Do you need pectin for pear jam?
Not necessarily. Pears contain some natural pectin, especially when slightly underripe. That means you can make pear jam or a pear jelly recipe without added pectin if you’re willing to boil it longer. But for a firmer, more reliable set—especially if you’re short on time—using pectin makes the process smoother and faster. I like using liquid pectin when gifting jars to make sure the texture holds up.
Do pears need to be peeled for jam?
Nope, and that’s one of the things I love most about making pear jam or a pear jelly recipe. Since you strain the juice for jelly and cook the fruit down for jam, the skins soften or get removed in the process. Just give them a good wash, core them, and you’re good to go. In fact, the skins help add natural pectin and color.
Is pear high in pectin?
Pears are lower in pectin than apples or citrus. That’s why some batches of jelly don’t set as firmly when you skip commercial pectin. However, underripe pears contain more natural pectin than ripe ones. So, when possible, mix in a few firmer pears to help your pear jelly recipe gel without needing added pectin.
Is jelly better with or without pectin?
It really comes down to preference. Jelly with pectin sets quicker and firmer—it’s great when you want clean slices and consistency across batches. Without pectin, the flavor can be deeper due to longer cooking, but the texture is often looser and more spoonable. I enjoy both, depending on the mood and use. For gift jars or hosting, I lean toward using pectin for that polished finish in any pear jelly recipe I make.
Final Thoughts from My Kitchen
Every jar of this pear jelly recipe tells a little story. Mine began with too many pears on a rainy day and turned into one of my favorite traditions. Making jelly from scratch taught me patience, showed me the beauty of seasonal fruit, and filled my pantry with gifts from my own hands. There’s something almost meditative about straining juice overnight, hearing the lids pop as jars seal, and seeing that golden glow on your shelf.
Whether you’re new to home canning or just love discovering ways to use fresh fruit, pear jelly offers a sweet reward. Try pairing it with cheese boards, roasted meats, or fresh pastries. It’s a small act of cooking that carries big flavor.
Don’t miss our Homemade Peach Preserves Recipe for more ways to bottle up seasonal fruit.
Check out Sugar-Free Jam Ideas if you’re cutting back on sweetness.
Discover great ideas like this No-Pectin Canning Guide to explore natural ways to preserve fruit.
Looking for inspiration? Try our Strawberry Angel Food Cake with a touch of jelly drizzled on top.
Let’s stay connected! Follow my kitchen moments on Facebook or get inspired by small-batch ideas on Pinterest. There’s always something simmering on the stove.